Arduino ESP32 ROS2 robot platform firmware available

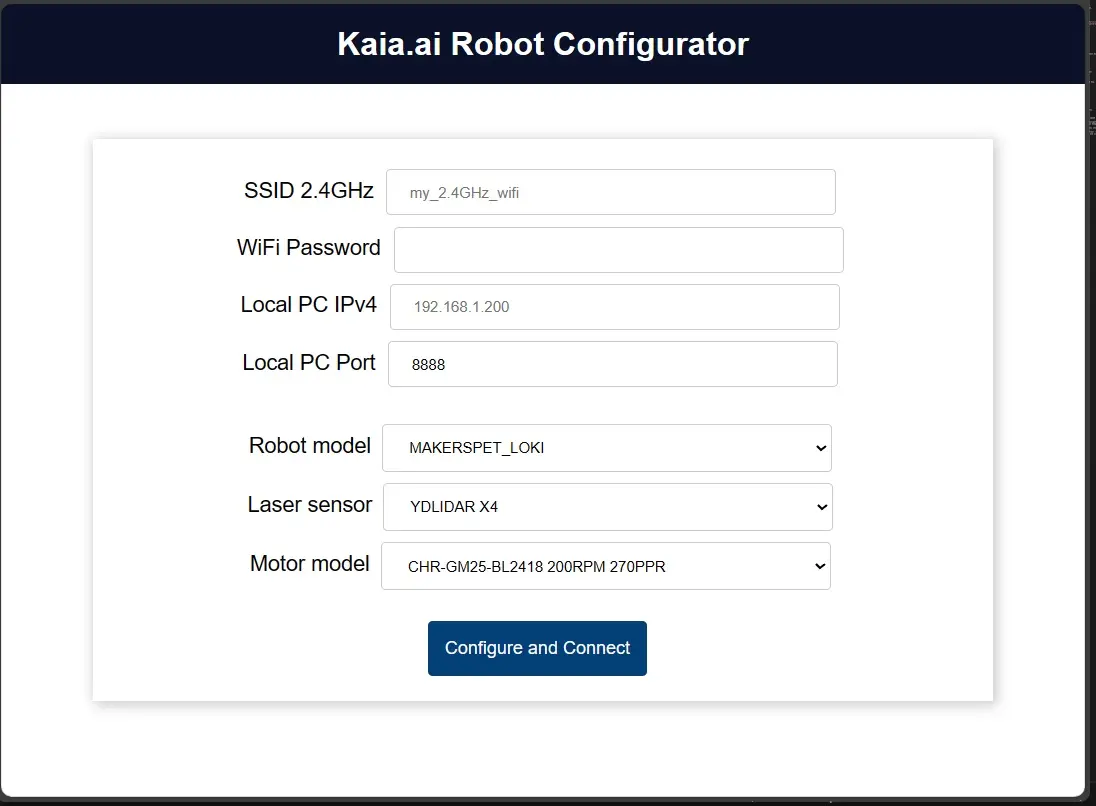
Developer log update - I have combined various Kaia.ai-compatible firmware including Maker’s Pet Loki, Fido and Snoopy into a single “platform” firmware repository and revised the single firmware to be configurable using a web browser.
If you operate a Kaia.ai - compatible robot:
- upload this platform firmware to your robot’s ESP32
- put your robot into the AP (WiFi access point) mode
- connect to the robots access point
- open a browser on your PC or mobile device
- navigate the browser to 192.168.4.1
- configure your robot
- if you are using a Maker’s Pet robot model (Loki, Fido or Snoopy), just select that model
- if you are using motors different from the Maker’s Pet default motor models, select the motor model. If your motor model is not listed, select
CUSTOMand type in your motor’s properties: the maximum motor RPM and the motor encoder’s PPR (pulses-per-revolution) of the motor shaft - if you’ve modified a Maker’s Pet robot design or designed your own robot compatible with Kaia.ai platform, set the robot model to “CUSTOM” and enter the requested model properties including the robot body outer diameter, the wheel base (i.e. the distance between wheel tire midpoints), the robot’s wheel diameter and the maximum allowed acceleration.
Let me explain the “motor encoder’s motor shaft PPR” (or just “motor shaft PPR”) a bit more. Motor shaft PPR is the number of pulses the motor encoder emits as the motor shaft (not the motor core) completes a full 360 degree revolution.
A gearbox motor consists of a motor core and a gearbox. The motor core usually spins relatively fast, e.g. thousands of revolutions per minute, but its “strength” (intuitively speaking) is relatively “weak” (i.e. it has a low torque). The gearbox attaches to the motor’s core to bring down the motor core RPM, while boosting the motor “strength” (motor shaft torque) using (usually) a number of gears (usually) encapsulated in some sort of housing. The [motor shaft RPM becomes] the [motor core RPM] divided by the [“gearbox ratio”]. Also, in an ideal motor with no friction, the motor shaft [torque] (“force”) becomes amplified: [motor shaft torque] = [motor core torque] x [gearbox ratio].
Since Maker’s Pet Loki, Fido and Snoopy robot models attach a wheel directly to the motor’s shaft RPM is same as the robot’s wheel RPM.
Let me also explain about the “maximum acceleration” setting. This is the maximum acceleration of the robot’s wheel vs the floor. Intuitively, if your motor is strong and fast - and you set the maximum wheel acceleration value too high - you robot’s wheel may start slipping against the floor. Also, even if you set the maximum wheel acceleration low enough to avoid the wheel slippage, if you robot is way too heavy, your motor may struggle to accelerate your heavy robot, thus overloading your motor. Some motors (in particular BLDC brushless motors) have built-in overload protection that detects an overload condition and stops the motor after a few second). In other words, set the maximum wheel acceleration as high as possible, yet wihout having the wheel slippage or motor overload.
One more point to explain - what is the robot’s firmware AP (WiFi access point) mode how to enter this mode. Your robot requires a WiFi connection to operate. When you upload firmware (and firmware sketch data) to your robot for the very first time, your robot does not “know” how to connect to your WiFi. In this situation, your robot’s ESP32 sets up its own WiFi that you can connect to using a PC or a mobile handset device. For example, the WiFi set up by your robot’s ESP32 can show up as “MAKERSPET_LOKI” in your list of WiFi connection. You can tell that your robot has set up its own WiFi (i.e. has entered the AP mode) - and is waiting for you to connect to its WiFi to get configured - by observing your robot’s ESP32 LED lighting up solid (constant on).
If you have already connected your robot to your WiFi, you can force your robot to re-enter the AP mode for configuration purposes by pressing and holding your robot’s ESP32 board’s EN button for 10+ seconds.
There are also situations when you have already configured your robot to connect to your WiFi, yet your robot has failed to connect your WiFi for whatever reason. In this situation your robot will also enther the AP mode (i.e. will set up its own WiFi and wait for to be configured). If you are sure that you have configured your robot correctly - including your WiFi name and password - just press the reset (EN) button on your robot’s ESP32 board to make the robot’s firmware restart and try connecting to your WiFi again. As a sidenote, I have problems - consistently - with my Google Pixel 7 smartphone’s WiFi hotspot. I think it has a bug - any device (my robot or my Windows laptop) connecting or reconnecting to the WiFi hotspot fails to connect. My workaround to fix the connection problems is to turn my smartphone’s WiFi hotspot off and on.
 Get an early launch invite from us, subscribe to our newsletter